Preparing Vector Files
When preparing vector files - or any other graphic file - it is important to know what the image will be used for, before the artwork is prepared, so that the vector graphic can be prepared to comply to the specific process requirements. Some printers and sign makers may request certain elements on an image to overprint (which I also like to call overlay or "in separate layers" so that it applies to non-printing processes too) or to be knocked out.
Some things are just much easier explained with an image:

But just in case you can't see the image above. With overprinting you overlap all elements - for example a star over a circle - and when they are separated for printing or cutting, each element is complete, you have a complete circle and a complete star. When separating a vector image that was designed with a Knockout, the element on the bottom ends up with a hole in the exact shape of the element above and the element above is fitted inside this hole. (I don't know if any of this makes sense without the image above) You don't have to actually draw the knockout manually, graphics programs do it for you, you just have to pay attention when you go to design school - or like me - use the HELP menu within your graphics program!
Closed objects, lines, strokes, outlined paths
When preparing vector files for certain services including vinyl cutting, engraving and some plotters, we need to make sure the outline or wireframe of the image (viewed only within the graphics and the service provider programs) complies with the service provider requirements.
Their machinery is guided by this outline or wireframe and require that the vector image is designed with closed objects and no intersecting lines or no overlapping paths.
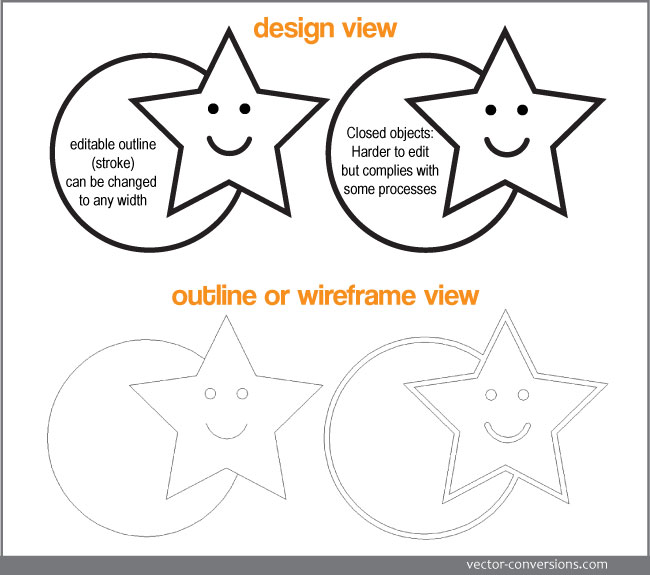
On design view, both images above look the same. The image on the left has an editable outline (stroke) and the width of the outline can be easily changed. This same image's outline (path) has been outlined and merged into a closed object (right image). The image on the right is now harder to edit but is ready for processes like engraving, plotters and vinyl-cut signs. These differences are only noticeable in the outline or wireframe view of the design program and do not affect how the image will look once is processed into a sign, engraving, etc.